


Find Me
spratt@antiochcollege.eduSKILLS & INTERESTS
Cooking Psychology Sustainability Culinary Ethics Farming Farm to Table TravelingMy Work
Accomplishments
Gallery I
Gallery II
The Broke Chef: How to Sharpen a Knife Using a Sharpening Rod
Sep 21, 2017
One of the most vital tools you use in the kitchen are your knives. When using knives, it is important to make sure they stay sharp…the sharper the knife the easier it will be to use. When you have a dull knife you are forced to apply more pressure which allows more room for error. You really want to let your knife do the work when cutting so that you stay as safe as possible. This is a short video on how to use a sharpening rod to keep your knives crisp. Sharpening your knife improperly will only dull it.
Click this link for tutorial: Knife Sharpening Tutorial
The Broke Chef: Shrimp Pad Thai
Sep 21, 2017Hi everyone,
Today I will be giving a recipe that is a little bit larger and more complicated than previous posts, but is definitely something anyone can tackle. I personally love Thai food and this is my own personal version of Shrimp Pad Thai.
Shrimp Pad Thai
- 21-42 deveined shrimp
- ½ of16 oz package of rice noodles
- 1 can sliced waterchesnuts
- 2 cups baby corn
- 1 cup bean sprouts
- 1 cup peanuts (unsalted)
- 1 cup sliced almonds (optional)
- 1 limes
- 5 garlic cloves
- 1 white onion
- 1 cup cut scallions
- 1 red pepper
- 2 avocados
- edible flowers (optional)
- 1 cup sesame oil
Shelby’s Pad Thai Sauce
- 2 cups sriracha
- 1 cup coconut milk
- 1 lime
- 1 ½ cups peanut butter
- 1 cup hoisin sauce
- 2 cups toasted sesame oil
- ½ cup red pepper flakes
- 3-5 cloves of garlic
- salt & pepper to taste
Food Prep:
Most of the time cutting everything up takes the most time, and when things are being cooked there is a delicate balance of time that must be taken into consideration. I like to prepare all of my vegetables and ingredients before hand so that when it calls to add them to what you are cooking you can do it with more precision of time.
First dice up the red pepper and white onion keeping them separate, set aside.
Next mince up all the garlic you will be using, set aside.
Remove the tails off your shrimp and place them back into the fridge.
Lastly, placing the scallions at an angle to your knife slowly cut for garnish, set aside.
Leave the avocado and the lime to cut at the very end for freshness.
After you have prepped all of your ingredients add 10-15 cups of water to a big pot and bring to a boil. Once you have brought the water to a boil add the rice noodles and allow cooking for 6 minutes. Once the rice noodles are done strain them under cold running water. Add a palm sized amount of sesame oil to the noodles to prevent them from sticking to each other and then set them aside.
In the meantime, start to warm up some sesame or olive oil in a big wok or skillet. Add the diced onions, minced garlic, peanuts and almond slices. Sweat the onions and garlic. Sweating is a process in which you bring the onions and garlic close to caramelizing, but instead you stop a step before that. At this point the peanuts and almond slices should be slightly roasted. In the same pan add the baby corn, waterchesnuts, and bean sprouts. Cover and allow to cook for 20 minutes stirring often.
In a medium sized pot we can begin to make Shelby’s Pad Thai Sauce. Combine all ingredients into the pot and stir constantly. You are looking for a medium thick consistency. If it becomes too thick try adding butter to the mix, or more coconut milk. If it becomes too thin consider adding more peanut butter. Salt and pepper to taste. Keep on a low heat setting to remain warm.
Check in on your vegetables and nuts that are cooking, making sure nothing is burning on the bottom of the skillet. Next set up a skillet to cook the shrimp in. Warm up some sesame oil or olive oil and place the shrimp in the skillet. Flip the shrimp constantly. The shrimp will only take approximately 5 minutes to cook.
Once the shrimp and your vegetables are done, add the vegetables to the big pot that you cooked the noodles in. Then add the noodles to the wok or skillet your vegetables were in. Allow them to heat up a little and get slightly browned. After that add them back into the big pot with the vegetables. Pour sauce over the noodles and vegetables leaving a little bit of sauce for plating. Stir everything together.
At this point you should cut the other lime into at least 7 slices. You should also cut the avocados as well. I prefer to leave the avocado slices to be long and lengthy, but you can cut them however you feel is best.
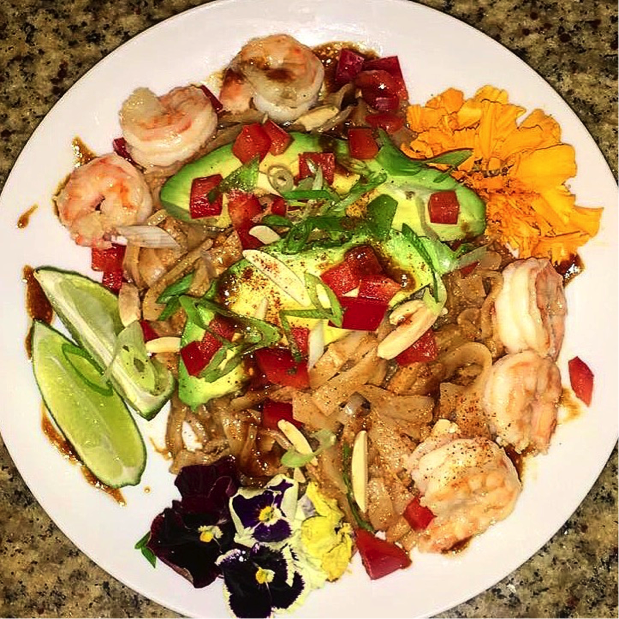
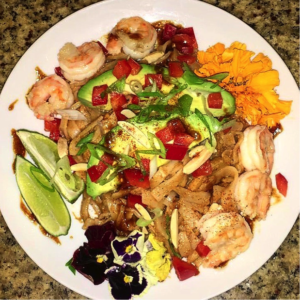
To plate take a big heap of noodles and vegetables and place in the middle of the plate. Then place the avocado slices on top. Drizzle the leftover sauce over the entire dish. Then sprinkle scallions and red peppers over top for color. Next take the lime wedges and place on the side of the dish along with edible flowers of different colors. In the space left on the sides of the dish add the cooked shrimp. The picture above is a good example of this exact plating. Serve immediately.
For a cheaper, more simplified version use rice noodles, water chestnuts, sprouts, peanuts and sauce along with whatever protein or other vegetables you enjoy. You can also buy pre-made pad thai sauce in the same area of the grocery store where you will find the water chestnuts and sprouts.
The Broke Chef: Sandwich Salads (Tuna, and more)
Sep 06, 2017Today I woke up HUNGRY, so I spent some time rummaging through the cabinets to see what ingredients I already had. I found a can of tuna somewhere in the deep dark hole that is my pantry. I decided to make a tuna salad out of it, but you can replace tuna with chicken, potato, egg, macaroni, etc.
Ingredients
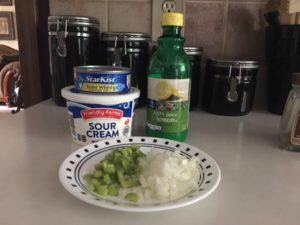
1 can tuna
2 T sour cream
1 stalk of celery
1/2 c white onion
2 tsp. lemon juice (I prefer squeezing one real lemon into this dish, but I didn’t have a real lemon so lemon juice it was)
——————————————————————-
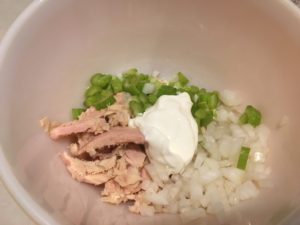
- Open can of tuna, rinse and drain.
- Dice onion and celery, combine with tuna.
- Add sour cream and lemon juice, mix thoroughly.

This is a stoping point at which you could be done. However, if you do enjoy seasoning food then here is what I recommend adding.
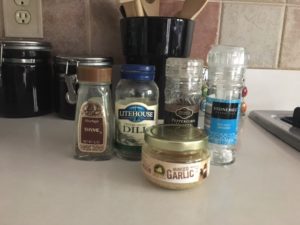
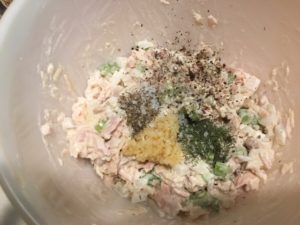
Thyme, Dill, Pepper, Salt, & Garlic
Of course these are all better if you have access to fresh versions, and if you do use fresh herbs use double to amount you would dry ingredients in order to obtain the same taste. I do not currently have these in fresher versions so I will be using what I already have.
The more you stir, the more broken up the tuna will become, thus allowing it to stick together. If you want chunkier tuna salad then I recommend stirring less.
That’s it, you’re done! Refrigerate for up to a week.
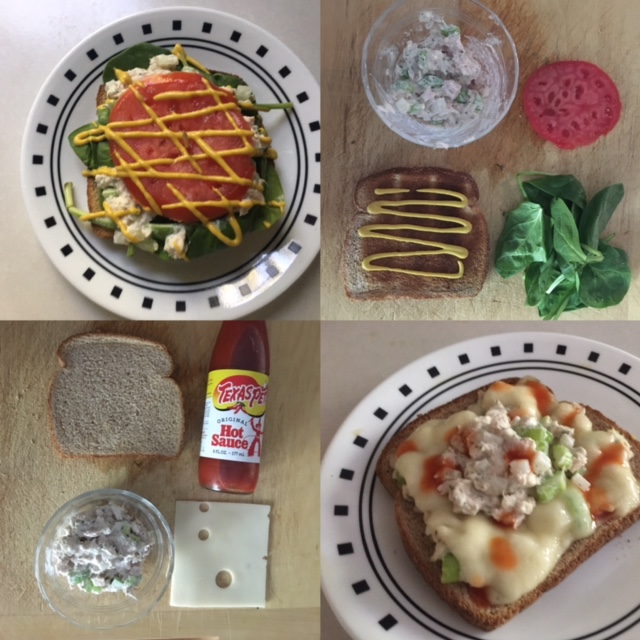
Here are a couple ways I enjoy tuna salad:


Toast bread, apply mustard, layer on spinach, add tuna salad, top with tomato and more mustard.
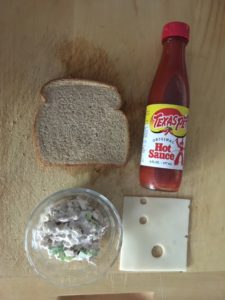

For this one, apply a layer of tuna salad, then a slice of cheese (I used swiss), and then bake at 400 degrees F for 5 minutes.

Top with a small layer of cold tuna salad and some hot sauce of your choice.
The reason I used tuna is because 1. I already had it and 2. because you can find it as cheap as 50 cents sometimes. It is a great inexpensive protein that you can find in various different colors and types.
If tuna isn’t your thing you can simply replace it with:
Chicken: add celery, red onion, cut red grapes, nuts, lemon juice, yogurt or sour cream, seasoning
Potato: add celery, white onion, mustard, yogurt or sour cream, seasoning
Egg: hard boiled egg, celery, white onion, mustard, yogurt or sour cream, seasoning
Macaroni: cook macaroni, add yogurt or sour cream, white onion, mustard, celery, seasoning.
The reason I used sour cream in this recipe is because I already had it in my fridge. Most of the time when I am making these types of salads I used greek yogurt. A lot of people make these salads using mayonnaise, but I generally attempt to stay away seeing as it isn’t so good for you. If you prefer the taste and texture, by all means do it by your preference. There is a way to make home made mayonnaise that is healthier, but that will be another post.
Hit me up with questions, comments, concerns, ideas, inspirations, thoughts, you name it!
The Broke Chef: 3 Ingredient Cheesy “Bread” (GF, SF,NF,MF)
Sep 04, 2017Sometimes when I look at recipes and see a long list of ingredients I immediately become overwhelmed, or assume that it will be too expensive. If you can relate then this recipe is dedicated to you.
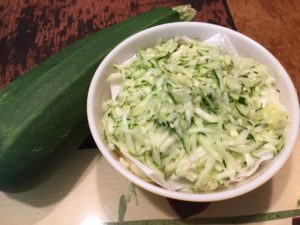
My dad grew a lot of zucchini in his garden this year, and because of that I got a few for free, thus the reason this recipe came into my life.
Lets start!
Ingredients
————————————————-
1 Zucchini (medium sized)
A few handfuls of cheese (shredded)
2 Eggs
Thats it.
So here is what to do:
First, you will want to shred the zucchini. I used a cheese grater for this step.
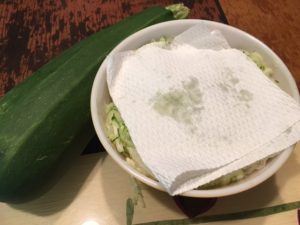
IMPORTANT IMPORTANT IMPORTANT: you must get rid of the liquids in the zucchini for this to work. I usually add salt, which allows the moisture to be sucked right out, let it sit in a strainer for 30 minutes, and then pat dry with paper towel/rag. Squeezing the liquid out works too.The best method I have found is to use a cheese cloth to squeeze out the juice, but lets be real…no one has cheese cloth. It is imperative though that the zucchini be drained completely.
Next, combine the 2 eggs and the cheese with the drained zucchini…mix well. From my experience, this recipe works better when you use finely ground up parmesan cheese.

At this point, if you have room in your budgets for seasonings, or maybe already have a few you could add those in. I usually incorporate garlic and parsley. Other seasons that match well include: basil, thyme, marjoram, oregano, rosemary, sage, etc.
Then you bake until the cheese has melted and the edges have browned. It took 25 minutes for me, but can vary depending on how much cheese you use, how well you drained the zucchini, and if you have added any other ingredients. You could add corn starch to thicken it up and allow it to rise more like bread, but if you can’t afford it/it doesn’t fit into your pantry and you would never use it again then skip it…you won’t miss it.
I topped mine with some fresh parsley in order to give it some color and flavor.
I fed this to my nephews that came to visit and they loved it. They paired it with some marinara sauce and did not seem miss to the gluten at all.
Enjoy. Reach out to me for comments/questions/concerns/ideas/inspiration/anything.
The Broke Chef: 10x Cheaper Hummus
Aug 22, 2017 One of my favorite foods is hummus, however it can get pretty expensive to buy, not to mention how small of an amount you get. Luckily making homemade hummus is pretty easy with the right tools. A food processor, blender, or emulsifier is necessary, but doesn’t have to be as expensive as it sounds. Most of the time you can find one or all three at second hand stores such as Goodwill. I have found multiple there in the past for less than $5.
Ingredients:
- 1 can garbanzo beans (chickpeas) $0.69 to $1.00/can
- 1/4 c to 1/2 c tahini (sesame seed paste) – can be made by putting sesame seeds in food processor
- lemon juice to taste
- any seasoning you want
- The key to getting a really nice creamy texture is to run the lemon juice and the tahini through the processor/blender/emulsifier until you get a creamy texture.
- After you have those two ingredients combined, then you add the garbanzo beans. I drain the juice first and then dump the whole can in.
- You may need to add oil in order to get it processed all the way. Lastly, add anything you would like your hummus to taste like.
If you are on an extremely tight budget, skip the tahini. Your hummus won’t be as creamy, but it will get close enough to the point.
I like to add cumin, or go a completely different route by adding dill. Some people like sriracha, peppers, or hot sauce. You can roast red peppers to make a classic red pepper hummus. Garlic is a must for me. For pinkish/purple hummus I add beets, for green hummus I add spinach. You can play around with it as much as you want, that is one of the great things about making your own hummus.
Hummus is great for spreading on wraps and sandwiches, as well as serving as a dip for veggies and chips. The possibilities are endless.
If you have any questions, or something is unclear feel free to talk to me about this recipe.
The Broke Chef: Food on a Budget
Aug 22, 2017Working over co-op and supporting yourself financially can be challenging. Here are a few tips that help me save money on food so that I can spend it elsewhere.
- Go plant-based (or mostly plant-based). In other words, cut back on meat. Meat is usually the more expensive items in your shopping cart, so bulk up your meals with veggies, fruits, and starches. Plants offer a lot of protein, and the average american gets way more protein in their diet than they actually need.
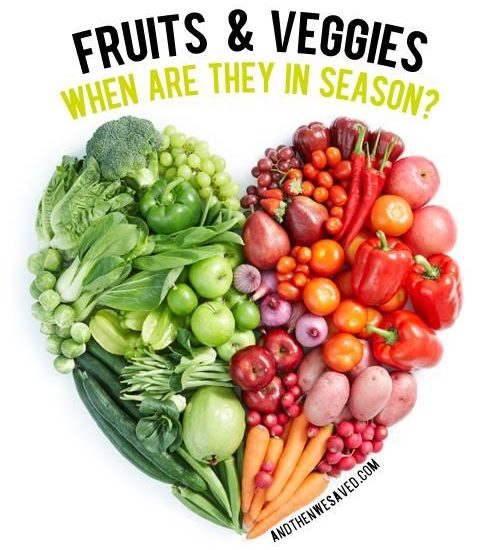
- Snowballing off the plant-based idea….buy produce that is in season, it will be cheaper. If you are unfamiliar with what is in season in your area check out this website which allows you to enter your location and provides you with an extensive list: https://www.seasonalfoodguide.org
- Look down when shopping. Most of the more expensive items are placed at eye level, so by simply checking the bottom shelves more often you could save money.
- If there are sales on non-perishable items that you use often…stock up.
- Rummage through your cabinets and fridge before you go grocery shopping…try to plan meals that utilize as many ingredients that you already have. This can require some creativity, but you can also plug in the ingredients you already have into this website and it will give you recipes : https://foodcombo.com
- Eat before you shop…you will have more impulse control…hopefully!
- If you find a place you shop frequently, ask if they have membership cards that allow you to be incorporated in special discounts and coupons.
- If you often buy fresh produce and find that it goes bad before you uses it, consider buying frozen or freezing food yourself. This also works with leftovers.
- Lastly, hunt for yummy farmers markets…this is where you will find cheap produce, and the chance to support local farmers.
Here is a list of some budget friendly foods to get started:
potatoes, oats, whole-grain pasta, carrots, broccoli, leafy greens, beets, cabbage, apples, bananas, pears, oranges, peanuts.
Keep an eye out for posts that will include shopping lists and recipes! Send any ideas/comments/concerns my way, I’d love to hear them!
The Broke Chef: Intro
Aug 22, 2017 Hi everyone! As you probably know my name is Shelby, and I am a 4th year at Antioch College. My last two co-ops have been spent working in kitchens/dealing with food, and it is a HUGE passion of mine. If you’re like me, and don’t have a fat stack of money lying around, then you can understand how difficult it can be to create meals for yourself, and even harder to make them healthy. Have no fear…the broke chef is here. On this page you can find recipes, tips on how to save money at the grocery store, how to cook things properly, how to substitute ingredients, how to anticipate food over co-op, and so much more! If you have any ideas, or you want to see anything specific please let me know, I would like this page to be as helpful as possible. Enjoy.
P.s. Excuse my crazy eyes…working in kitchens with sleep deprivation equals weird facial expressions!
.
The Broke Chef: KEY
Aug 21, 2017Here is a quick guide to some acronyms I may use for recipes so that you are aware of what is in the food.
GF = Gluten Free
V = Vegan
SF = Soy Free
DF = Dairy Free
EF = Egg Free
MF = Meat Free
NF = Nut Free
PB = Plant Based
You will find these at the top of recipes for maximum efficiency.